

Some quick tips on improving your times through T1 & T2...
Before the race/prep:
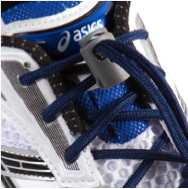


Buy and install Speed laces or something similar for your running shoes. This is an easy and inexpensive way to save time in T2. You can lace them a little tighter around the toe area for a bit more stability, but leave the entry area a little looser to make it easy to slip your foot in place.
Buy and utilize a race belt as it makes it much easier and faster to put your race number on in T2. Make sure you try the belt on with the number attached, to make sure your have put enough slack in the little attachment connectors.
You can make it easier to get your wetsuit off using TriSlide. Prior to putting on your wetsuit, coat the top of your feet, ankles and midway up the calf. Coat the back of your hands, wrists (over your Garmin) and midway up your forearms. I try to avoid the bottom of my feet and palms of my hands, as it does make things slippery. After putting on your wetsuit, apply a light coating to the outside of your wetsuit up to midway up your forearm and calves as well, as this is the part you want to make slippery to make it easy to get off. The calf part is important, as getting wetsuits over the feet is where people struggle.
I recommend going sockless on short course races (sprints and Olympics), as it saves time in transition. You want to practice running sockless for short distances (1 to 3 miles) to see if you have any issues with your running shoes. To help avoid blisters, I use body glide and liquid bandage. I use my fingers to scrape some of the glide off the dispenser and then spread it inside my shoes to areas where I may feel my feet rub. Typically this would be around my big toe, small to, area by my Achilles, etc. Try to avoid getting it on areas where you want to grip your shoe to put it on, like the top of the tongue and the very top by the heel. You can put the glide a little further down… just give yourself a grip area for your hands to make it easier to get your shoes on. I also use liquid bandage (New Skin) and coat areas of my feet (in the morning before I leave the house, where I might get rubbing (as above). Liquid bandage also works well if you get a blister… hurts to apply, but effective.
Transition Area Selection & Setup
- Minimize the amount of time to run with your bike, as it is always slower to run with a bike. For races that have the same bike out / bike in (e.g. Hickory Grove or Bluff Creek, locally), there is a big advantage to finding a location as close to the bike in/out as possible. It is often good to be near a bike support on the rack, just to have one less person close to you in transition.
- Find a location that is easy to remember and find. Utilize a brightly or unique colored towel to help you quickly locate your area. I usually count and memorize how many racks my bike is from the first rack or some other notable location.
- Make sure your bike is in a low gear (biggest gear in your back cassette) before you rack it in transition, as you want to make it easy to get started pedaling once on your bike.
- If you use a Garmin Edge model mounted to your bike, set it to auto-pause and then start the unit while in transition. It will pause itself and then will auto-resume when you start to ride, so you won’t have to mess with it in the race.
- You will be faster overall if you leave your bike shoes on your bike, clipped in. The reason is that you will be moving while putting your shoes on, rather than sitting still in T1 & T2. It also eliminates the time required to stop after the transition line to actually clip into your pedals or clip out.
How to set up your shoes for a flying or gliding mount:

- Use thin rubber bands (you want them to break when you pedal) to keep your shoes from dragging on the ground when running with your bike. The goal for your shoes is to look like pics #1 and 2.
- Just loop the rubber band around the back of your shoe, as in pic 3. For your non-drive side shoe, attach it to your quick release as shown in pic 4. Your drive-side (right) shoe can be attached to your derailleur mount (pic 2).
- Make sure the Velcro to your shoes are open, to make it easy to get into your shoes while riding.
Placing your running gear next to your bike:

Place your gear in your transition area in the order you will put it on. Less is more… meaning you want the area simple and uncluttered. Place your running shoes on top of your race number / belt to avoid them blowing away if there is a wind. If you wear a hat or visor, have it flipped over so it easily goes on your head.
Placing your cycling gear on your handle bars:

Make sure your glasses and helmet are ready to be put on quickly. Your helmet should be positioned so that you flip it over and put it on your head, with the straps already opened and not tangled. This eliminates the chance of putting your helmet on backwards. Your glasses should go inside your helmet, with the arms open and ready to be put on.
T1 – Swim to Bike
- As I am finishing up my swim, I mentally say what I need to do in transition over in my mind… glasses, helmet, go. (Of course remembering that I need to get my swim gear off first).
- You need to have your goggles and swim cap off, and your wetsuit down to your waist before you hit the transition area. As you exit the water, remove your goggles and swim cap, and then unzip your wetsuit and pull your arms out of the sleeves as you run. Note, as an alternative, you can unzip and pull down your wetsuit before removing your cap and goggles, to have both hands free… just don’t forget to take off your swim cap.
- Drop your swim cap and goggles out of the way behind your shoes, race belt, etc. Pull your wetsuit down below your knees, but don’t bunch or double it up… that makes it harder to remove. Step on your wetsuit with your left foot and quickly pop your right knee upwards to pop your wetsuit off your right foot. Step on your wetsuit with your right foot, and pop up your left knee to pull your wetsuit off your left foot. Toss your wetsuit over the rack or out of the way of your run gear.
- Put on your glasses, and helmet and snap your helmet in place.
- Assuming your shoes are attached to your bike, grab your bike and run to the mount line. I prefer to hold my bike by the handlebar stem for better control.
- After you cross the mount line, you can do a flying mount… or my "gliding mount" variation. The key to understand is that you want to land or sit on your thigh when you get on the bike… not your crotch. This avoids some pain, and gives you a little more leg length for reaching your saddle and pushing off to pick up speed.
- Nice video tutorial on flying mount and dismount is shown here. The actual mount starts at 4:30 into the video.
- My gliding mount variant is simply running to the mount line holding the bike by the stem. I lean the bike toward me and put my right thigh on the seat (similar to the flying mount) and then simply push off three times with my left leg to build speed (sort of like pushing off on a skateboard) and then slide fully onto the bike.
- Next, put on your shoes as you ride. The key to successfully getting your shoes on / off on the bike is bike speed… you have to be going fast enough to keep your balance.
- When you first get on the bike, you simply put your feet on top of your shoes, and pedal to build up speed. If you are coming out of T1 going up an incline or hill (possibly like Bluff Creek), you will need to ride up the hill on top of your shoes, and then slip your feet into your shoes when you are going fast enough to balance.
- To put your shoes on, simply stop pedaling with your left foot down and right foot up, so you can grab the back of your right shoe and hold it in place while you slip your foot in and tighten the Velcro. Next, pedal a few times to build up speed again, and then stop pedaling with the right shoe down and the left foot up, while you put your foot into the shoe and tighten it down as well.
T2 – Bike to Run
- When coming back to transition, you basically start with doing the opposite of how you left transition. Stop pedaling with the left foot down, and loosen the Velcro and slide your right foot out. Note that often the shoe will spin on the pedal, so you need to use your foot to get it back in position so you can put your foot on top of the shoe. Then do your other foot. Give yourself some time to do this… don’t wait until the last second before the dismount line.
- Do a flying dismount. Basically this is much easier than it looks… and it is easy to control the bike. Here's a video of the dismount. As you come into the dismount line, stand up and lift your right leg around the back of the seat. Bend your right leg and pull it through between your bike and left leg, so your right foot is in front of your left. Slow down and simply step on the ground with your right foot, and jog across the dismount line.
- Jog your bike back to your spot and rack your bike. Again, I’m thinking helmet, shoes, belt, visor, go!
- Remove your helmet. Slip on your shoes. Grab your belt and visor and start running for the exit. Put on your visor as you run. Snap your belt in front (it’s easier) and spin the belt so your number comes back around to the front.
- Run fast… :)
Practicing these skills before the race is important. If you haven’t done the transitions with pedal mounted shoes, I’d recommend practicing in the following order:
- Practice putting your shoes on and off while riding. Repeat it five times for several days leading up to your race.
- After you have mastered slipping your shoes on and off, work on the flying mount and dismount. To practice the mount, start off just by putting your thigh up on the saddle, and pushing yourself forward on the bike. Do this until you can slide forward and start to ride. This is my "gliding mount" alternative to the flying mount. Once you get that down you can do the hop and do the flying mount. For the dismount, practice taking your right leg off the bike and moving it around to the other side. When comfortable, slide it through so your right foot is in front. Slow and step down… it’s easy. Practice your mount / dismount several times for several consecutive days, until you don’t have to think about it to perform it.