

Lighting is a critical component in ultracycling, to ensure you can adequately see and be seen at all times. While it’s easy to get pulled into the lumens or lux of a specific light, it is important to consider your lighting system/strategy, as it relates to your specific race with factors including: how much light/throw distance, what type of light pattern is needed (peripheral light), battery life, on-bike pass-through charging, off-bike charging time, headlamp requirements, rear lighting, etc. You don’t want to learn the shortcomings of your lights/lighting strategy in the middle of your race, where it slows you down, makes you less safe, or even leads to crashes.
This article will be a work in process, meaning as I learn more and test new things, I will update this periodically. I will highlight what I’ve read, learned from athletes, used myself, and/or tested up to this point. This is a big and evolving area, and while I’ll discuss some typical strategies… the best strategy for each athlete is to understand their lighting needs for a specific race, purchase, use, and test their own strategy, as part of their training. As a whole, I’d recommend doing this well before the race itself (e.g. the year before a big race)… not in the 6 weeks leading up to the event. I will share what I would do on some example races… but these are just my thoughts as to how I would approach a race, and not a recommendation on what you should do (“a” way of doing things, not “the” way).
Executive Summary:
Key learnings in the past few years:
While good dynamo hubs (dyno) can be extremely reliable and convenient to use, they can create a significant amount of drag when used in a race. For ultra events, this can be a meaningful impact on overall race time. For example, for something like Trans Am (4200 miles) using a dyno can add 15 hours of riding time to the overall race length.
Light color and pattern matter. I’ll cover this in examples below, but unfortunately, just because two lights have the same lumen or lux ratings, doesn’t mean they provide the same usable light in actual usage.
Charging is an underappreciated factor. Consider how long it takes to charge the light (relative to your sleep/stop strategy), whether your light is capable of pass-through charging, whether it requires a special charger or whether it works with a high speed charger.
Consider your daily light duration requirements, and ensure your lights/stragegy will meet your needs, with some safety factor considerations. Typically most batteries tend to have reduced capacity/duration when it is cold outside. You should test your light duration (and not rely on the manufacturer’s quoted values), as well as testing with any battery packs/pass-through charging if applicable.
Based on what I’ve learned looking into lighting strategies, and testing lightings, charging gears, and dynamo hubs, here’s what I would use personally if I were doing the following types of races:
Single-day (ish) event (e.g. 20-45 ish hours) with no planned overnight stops, such as Unbound Gravel XL, Iowa Wind and Rock, Gravel Worlds Long Voyage, Natchez 444, Silver State 508, etc. I’d choose a light + battery pack to sustain the entire event, such as an Outbound Light Detour and a 15k battery pack. For supported races, I’d either use a smaller battery pack (10k) and swap them as needed, or potentially swap the entire light if using multiple lights. For self-supported races, I’d also use a headlamp (I have/use Black Diamond headlamps), so that I’d have light to see road signs (for gravel racing), roadside stops/repairs, and for walking if needed (e.g. muddy unmaintained roads on gravel events).
Intermediate multi-day event (3-5 days), with short overnight stops, such as Big Sky Spectaculaire, BC Epic 1000, Race Across the West, etc. I’d use a similar strategy to the single-day event, primarily using a main light + battery packs. For supported, I’d buy two of the lights for the redundancy and would swap lights or battery packs as makes sense. For unsupported, I’d use two 10k battery packs to have some redundancy, a high-speed charger (allowing light and battery pack to be charged during a short sleep strategy), would take a second small light such as the OL Hangover as backup (which could be used as either a bike light or helmet light with the right mounts), and again would use a headlamp. For most races, an O/L Detour would be a good light, although, for a mostly offroad race like the BC Epic I’d likely move to an O/L Trail Evo for even greater peripheral lighting (to be tested in the future). The caveat here is if I didn’t plan on staying at hotels, then I would consider a dynamo system, such as a Sinewave Beacon + a battery pack.
Long multi-day events (>5 days), with short stops, such as TABR, BNSUS, GAWR, Tour Divide, RAAM etc. For supported races, I’d use the same strategy as described above. For unsupported
races, I’d use a primary battery light + battery packs, and a backup dynamo hub light/system. The primary light and battery options would be the same as described above (same lights, chargers, headlamps, etc.). The dynamo system would provide a couple of benefits for this approach:If I couldn’t sleep at a hotel and couldn’t charge my lights/batteries, I’d switch the dynamo system as needed. Obviously, I’d use the dynamo to run the light at night, and would charge phones, bike computers, etc. as needed during the day. This avoids having to sit somewhere (restaurant, etc.) and wait for devices to charge.
I’d consider using it as a supplemental light for longer descents or poor conditions. The drag won’t be as much of a factor going downhill, and the additional lighting may be useful in poor conditions (fog, rain, etc.).
Background
*** This section needs to be completed yet… but continue below for more on run time testing, charging, beam pattern, output, etc. ***
Future topics to cover in this background section, the benefits and costs of dynamo systems, headlamps, batteries, chargers, rear lights, and blinky lights.
Runtime / Charging Durations
The following is a summary of the testing I’ve done, with the lights and battery packs I own. Note that the light testing was done on medium levels, in an attempt to get comparable light levels and run times for most of the lights I used. These tests were performed indoors, at temperatures between 65 and 70 degrees. When batteries are used in colder conditions, run durations tend to be shorter. I’d encourage each athlete to perform their own tests on their gear, as there can be variation between lights, battery packs or chargers (e.g. even two identical battery packs can have different run times).

It is important to understand that when charging lights, battery packs, cell phones, etc., both the charger and the device can impact the charging rates. In other words, your phone may have the capability of charging at 20 watts, but if you connect it to a 10 watt charger, it will take twice as long to charge. Many of the high-speed devices listed here can charge at 20w or 30w, when using a USB-C connection. USB-A connectors have some limitation in charging speed, and often do not charge quite as quickly. In the example above, when charging the Alfox high-speed 15k battery pack, with a high-speed charger I could charge it in about 2:15 via USB-C, but when charged with the same charger on USB-A, it took 3:50.
While there are many chargers that can charge at high speed, you need to make sure the charger has enough capacity to charge multiple units at high speed concurrently. In other words, if you have a 60w charger, and connect it to two 30w high-speed battery packs, and then a high-speed charging light (like th OL Detour)… one of your devices is going to sit idle while the other two get charged, as the charger doesn’t have enough capacity to charge all three concurrently at high speed.
The chargers and battery packs I tested here are:
Anker Prime 100w USB C Charger, 3-port. This is a bit of a heavy charger, but it’s not huge. What I liked about it is that it could concurrently charge three high speed devices concurrently. I also tested it with two high speed devices and an additional Anker port expander, to allow two high speed devices to be connected via USB C, and then 4 lower power USB A devices (e.g. Garmin computer, Garmin in-reach, Wahoo computer, etc.).
Anker Prime 67w USB C Charger, 3 port. This is a smaller and lighter option than above, but the wattage limits concurrent high-speed charging. If I had the USB-A loaded up, and both USB C ports, the second port would pause charging until the 1st and 3rd completed their charging. This may be useful if you wanted to take two of these, rather than a single larger charger, and not use an additional port expanding device.
Alfox 30w 15,000 mAh Power bank. There are a lot of power bank options. What was unique with this bank is that it has extremely fast charging (30w) and also allows pass-through charging, so it could be used with a dynamo hub (although I haven’t tested it that was) as a cache battery. I haven’t tried this on my bike, so I can’t speak to the durability of the device in the long run, but it was fine for testing, and lived up to it’s performance claims in terms of charging speed.
Alfox 20w 10,000 mAh Power bank. A small packaged power bank that allows pass-through charging, and includes a USB C and USB A pots. Again, during testing this worked great (fast charging at 20w, and great for pass-through charging lights), but I can’t speak to the durability when on the bike.
Other devices you may find useful:
1-foot power cord, in case you can’t plug your charger directly into a wall (e.g. there’s a night stand in the way, etc.).
USB C to micro adapter, in case you need to go from a C port to a micro port.
USB C Couplers, to extend two USB C cables, if needed.
USB C to USB A connector, if you need to use one of the USB C battery ports for a USB A cable.
USB A to USB C connector, this will convert a USB C to C cable to a USB-A on one end.
Multi-port power reader for electronic devices. I used this to get detailed charging information from the electronic devices… good bang for the buck.
Power reader for USB C devices. This is small and convenient for looking at power use of devices.
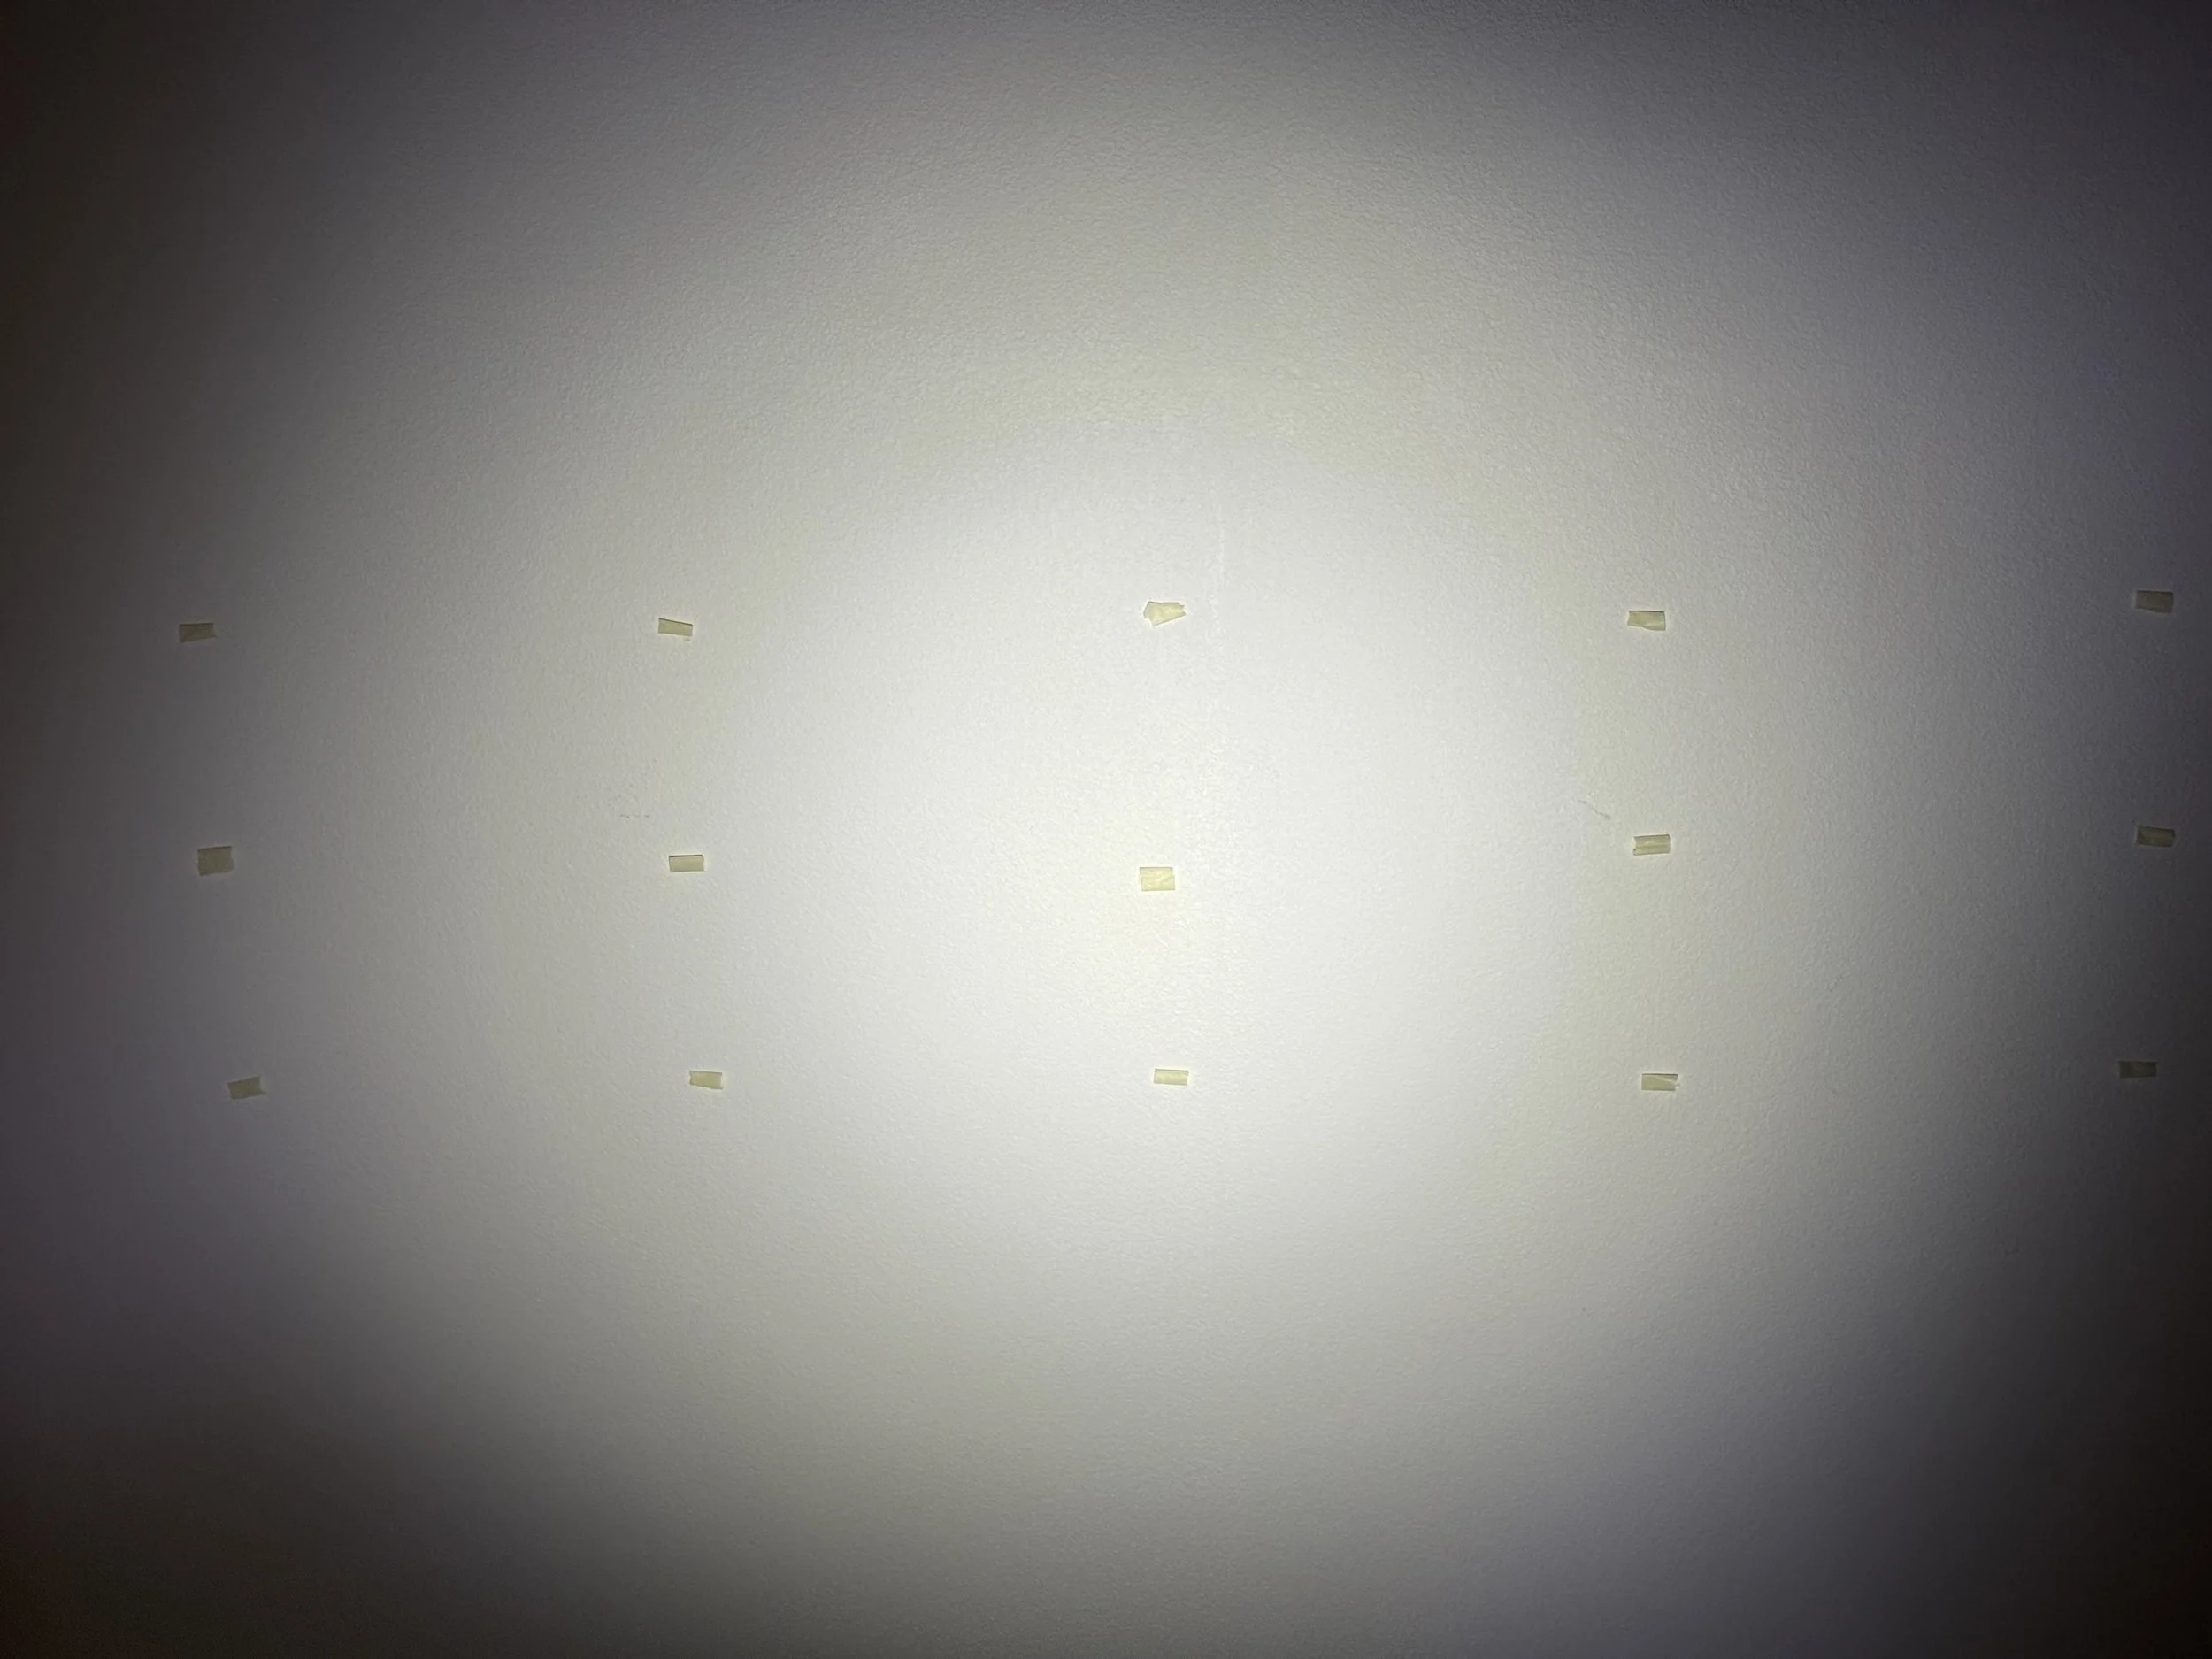
Indoor Beam Patterns
The lights were tested indoors, with an ambient lux level of zero. I projected on a white wall at 2 meters, and set up a grid to measure the light in a 9 grid pattern, as shown in this paper. I then took a picture of each light beam, and then measured the lux at each of the 9 points, and summarized it in the data below.
Outbound Lighting, Detour, Medium
Note that this light is rectangular, and is designed to have a cutoff line similar to an automobile. The benefit is that it helps avoid blinding oncoming drivers (or cyclists). This is a requirement for lights in some European countries. This does require a little more adjustment of the light during setup, to get the cutoff line set so it gives you good distance viewing, while still allowing the cutoff line to function. We can see a very distinct pattern on this light, with an obvious top cutoff, and a very wide and narrow (top to bottom) oval shape. The center is distinctly brighter, with three notable levels of light levels over the entire pattern.

Exposure Race MK13, Program 4, Medium
We can clearly see the difference in light pattern for a round light versus a rectangular shape, with a symmetrical beam pattern. The Exposure has a bright center, with some falloff on the perimeter. Overall, a uniform shape and distribution for this light.

Outbound Lighting, Hangover, Medium
Although this is a rectangular light, the beam pattern is oval-shaped. Interestingly, it has a pretty distinct bright center, that is somewhat oval up and down, and the perimeter lighting is more oval horizontally, side to side.

Sinewave Beacon, Series 1, High, external battery
Again, a circular and symmetrical light pattern, with a wider center section before the drop-off on the perimeter. The color is slightly warmer than the other lights.
Sinewave Beacon, Series 2, High, external battery
Similar to the Beacon 1, we have a symmetrical round light design and pattern. Note that the Beacon 2 center area is smaller and more focused than the series 1, with a bit more falloff than the original design. We see a similar warm color to the series 1 as well.
Although not tested for battery life, etc., I included this as a reference as I (and several T2M athletes) have these lights. We see a reasonably white light, and a symmetrical round beam pattern. There are somewhat three distinct light levels within the pattern, with more falloff on the exterior sections.
Test Results
I used the general methodology for testing, as described in this paper. I set up a tripod to hold the light 2 meters from a white wall at a height of 42”, with a 15 total measurement points at 10 degrees apart from the light (13.5” horizontal) and 5 degrees vertical (6.75”). The lux read at the reference points were used to estimate the average light levels across the 15 points, a calculated lumens value, and an estimated/calculated total peak distance in meters (described here). The values measured and calculated values for each light are shown below, with the values color-coded based on red being the worst in the group, and green the best:

What quickly becomes apparent is how the measurement protocol tends to favor round beam patterns, which don’t necessarily provide the best lighting outside (discussed below). In particular, the OL Detour with the cutoff line that is designed to avoid blinding oncoming traffic, performs more poorly from a numerical standpoint, with it’s smaller horizontal pattern. Likewise, it (and the other OL lights) do not get credit in this protocol for providing a wider beam pattern closer to the rider. This test doesn’t look at the light color, only at the output. Personally, I found the whiter lights (less warm color) tended to seem brighter and clearer, in outdoor use.
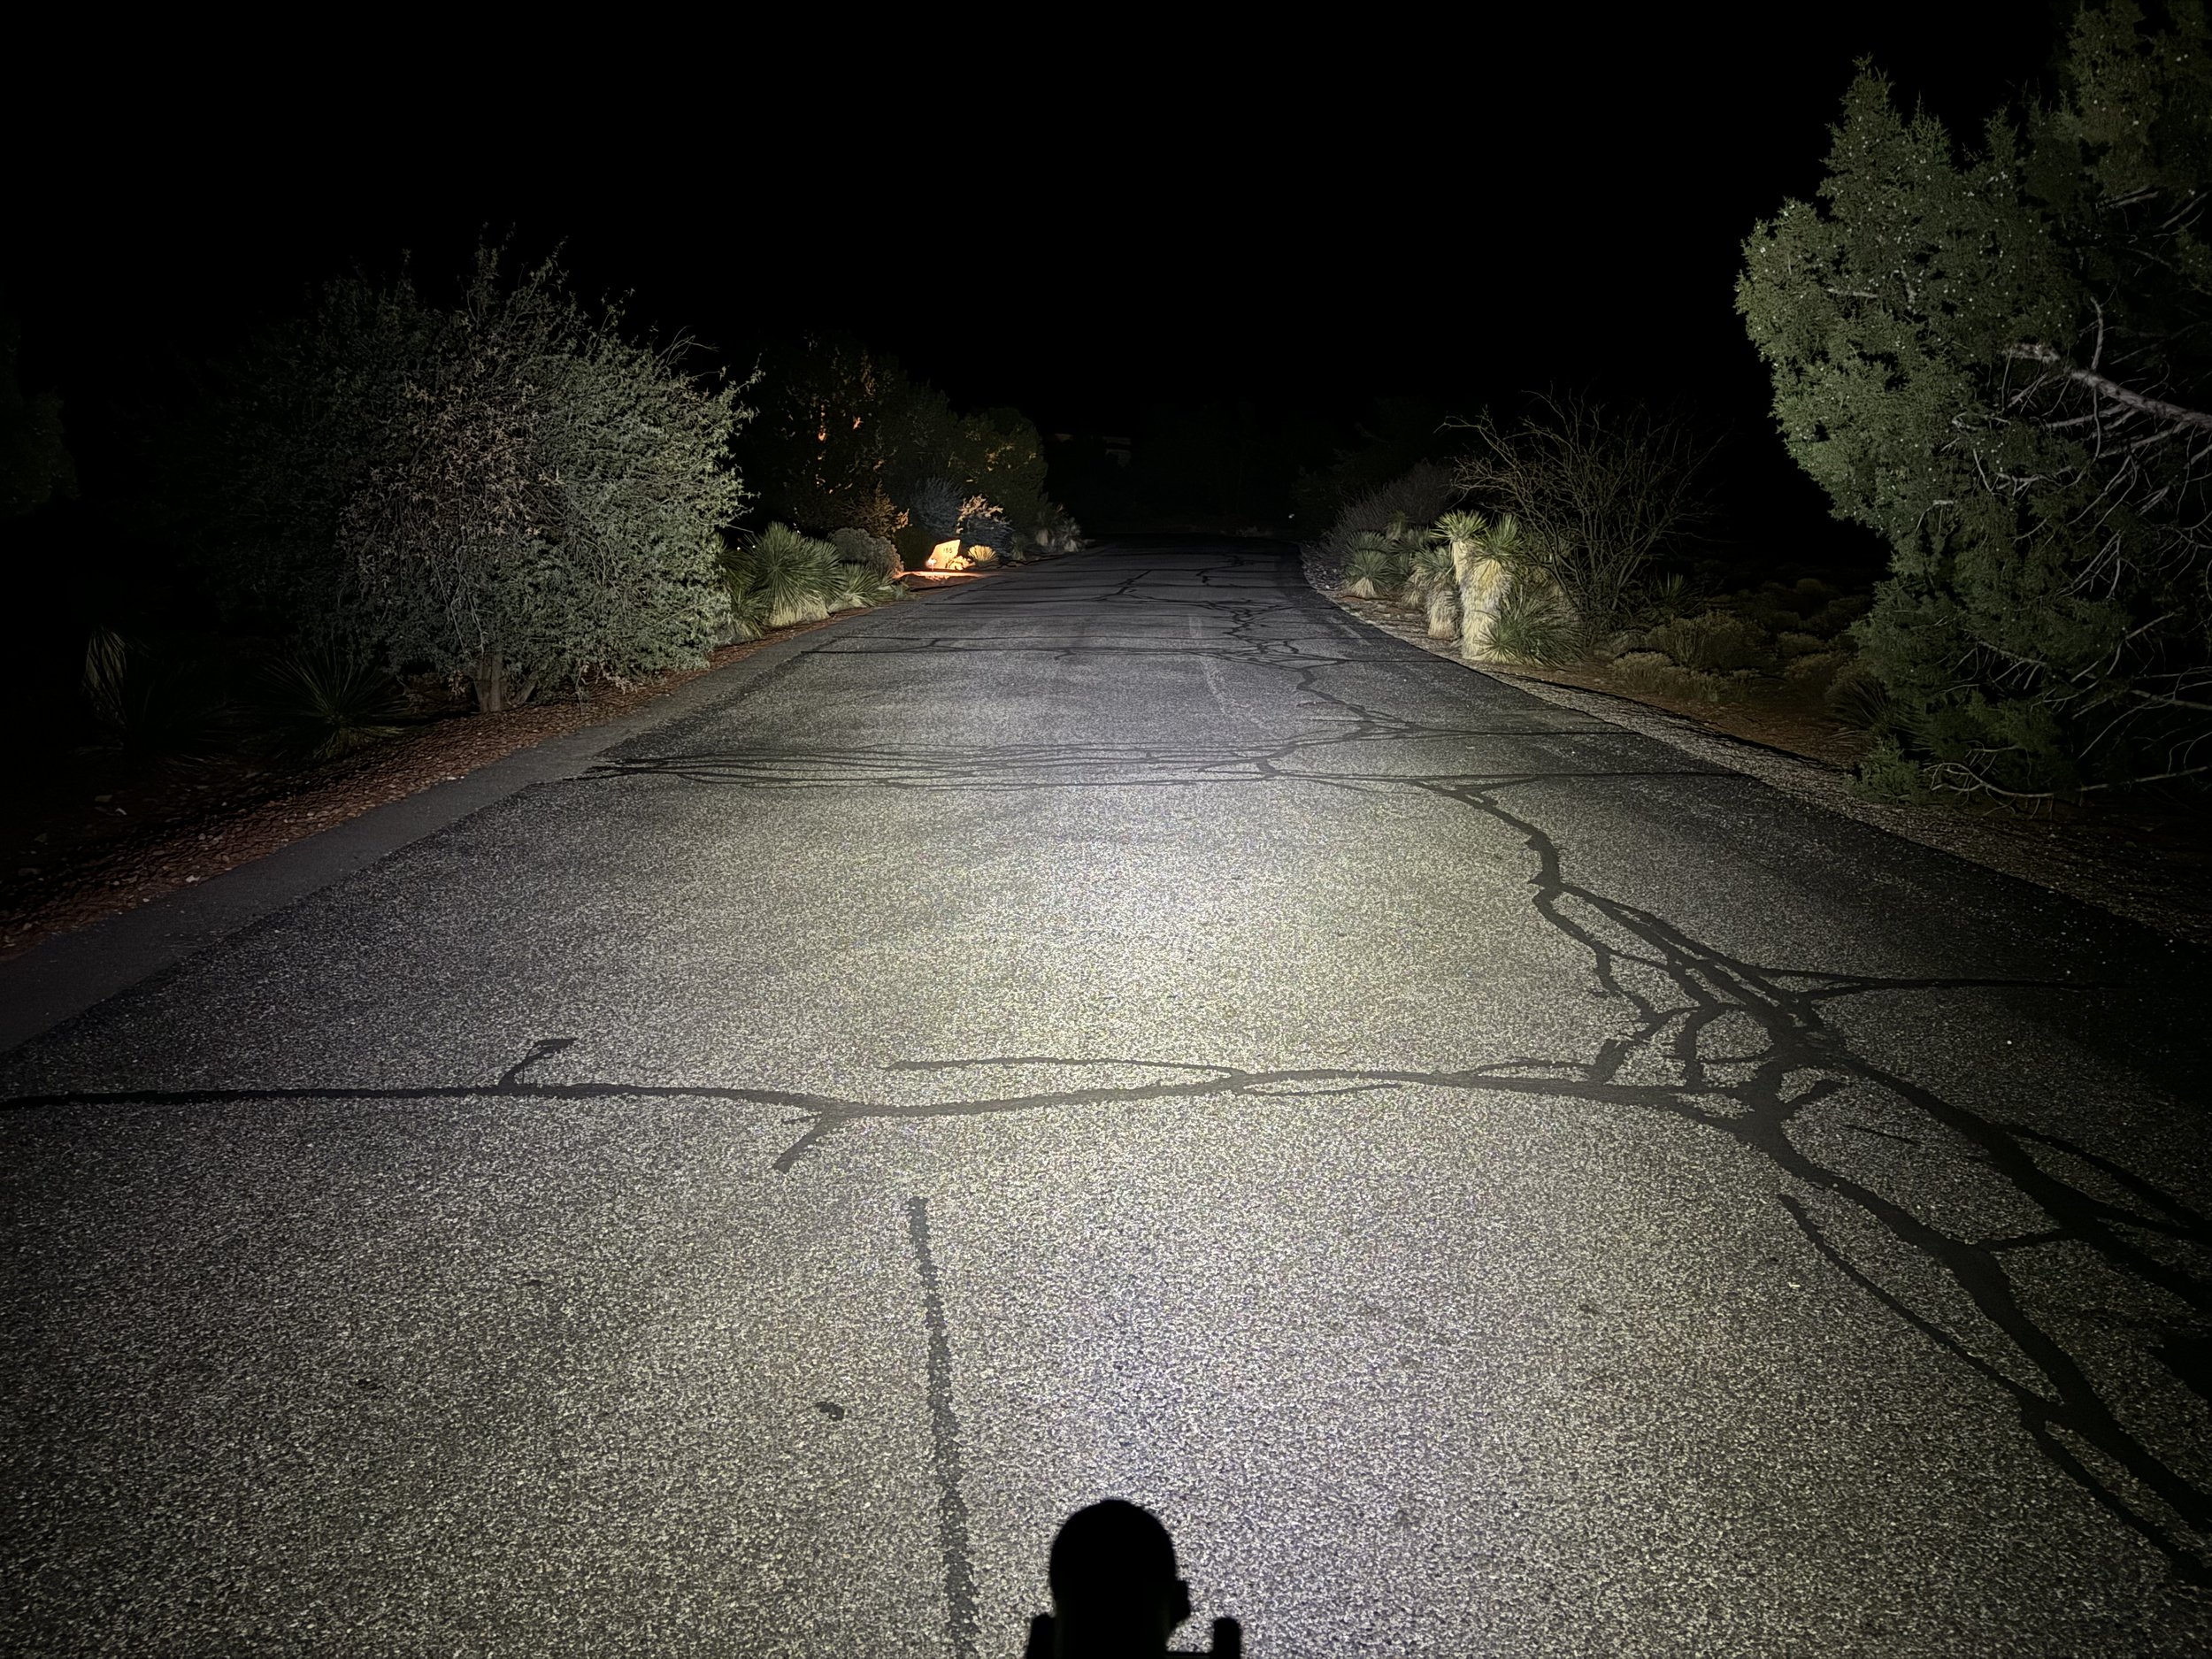
Outdoor Views
The following are pictures of each light, on a moonless night, on a residential road. Understand that the camera (phone) may make colors slightly different than reality, and slight variances in position may impact the beam patterns to a degree.
Outbound Lighting, Detour (Medium).
I felt this light has a good bright white color, with a very functional beam pattern. Note that this light has a cutoff, meaning that similar to car headlights, it cuts the output above a fixed line. This helps to avoid blinding drivers (or other riders), but does require you to adjust the beam pattern a little more closely when setting up your bike. Note that going uphill, there may be times when this cutoff light may limit your distance sight line a bit (more transitionally, rather than steady state uphill). Overall, this light seemed to light up the pavement near the light well, while also projecting well into the distance. There are two slightly dimmer areas (notable in the pic below as well as in the indoor beam pattern photo above), maybe 10’ ahead, otherwise it provided a really nice wide pattern.

Exposure Race MK13, Program 4, Medium
This light does a good job of illuminating the area immediately in front of the light, to an intermediate distance. It does have some darker areas to the sides, due to the circular shape of the light. It’s color was slightly less bright white, compared the Outbound Light products, but this may be due to the light being an older model (the bulbs may have changed in more recent designs). You can also see that being round, it tended to light up the sides more in the intermediate distance.
Outbound Lighting, Hangover, Medium
Note that this unit is designed to be a headlamp, and not sold as a bike-mounted light. That said, I use it in this manner and find it a pretty good design overall (particularly for a small light… it holds it’s own relative to the other lights tested here). Similar to the OL Detour, the light is a bright white, and the rectangular design provides a very usable light pattern. Note that this does not have a cutoff line like the Detour, so we see a little more distance on this light. This light didn’t provide quite as much light on the perimeter as the Detour, but more than the Exposure light.

Sinewave Beacon, Series 1, High, external battery
The Series 1 Beacon is another round light design, so we do see some falloff on the perimeter of the road… definitely more than the OL lights, and more than the Exposure light as well. It does provide solid lighting at the intermediate length, with some falloff at both close proximity and at a further distance. The light color is a less of a bright white than the OL lights, and less than the Exposure light as well.
Sinewave Beacon, Series 2, High, external battery
As noted in the indoor light testing, the beam pattern has changed between the original Sinewave Beacon and the newer Beacon 2. The pattern has a more center-focused pattern. This really helps with the distance lighting, but the cost is the perimeter lighting is not as good as the original model. We can see this both at close proximity to the light, but also on the edges of the road at an intermediate distance. The overall light color is similar to the original model.
Cateye Volt, 800, Medium
Although not tested for battery life, etc., I included this as a reference as I (and several T2M athletes) have these lights. Overall, the beam pattern shows some limitation of the small round design… a lot more falloff of light output on the perimeter than the rest of the lights. Overall, it has a good intermediate distance levels, and the light color is slightly better than the Sinewave units, similar to the Exposure, but not as good as the OL lights.

General Light Thoughts
O/L Detour - This is my favorite all-around light. It charges quickly (<2.5 hours), has a good practical pattern, a very white light, a solid total run time (5:52 on medium), offers pass-through charging (13:54 w/10k and 18:38 w/15k), and a great quick release mount. This could be a practical primary light for a lot of applications, and the pricing ($185 as of this writing) is very reasonable.
O/L Hangover. This is designed as a helmet light, not a primary bike light, but I often use it as my primary bike light. The beam pattern is great (it could be argued that it is slightly better than the Detour for off-road use, with more throw). It does have less battery, so as a standalone light, the run time is a shorter 3:21 on medium, but okay with a 10k battery at 12:52. While I didn’t test it with a 15k battery, I’d expect it to around 17:30, based on how the Detour performed with the 10k battery pack compared to the Hangover. The lack of bike mounting options and quick-release options are a consideration. I feel like this light could be a great and inexpensive option ($125 as of this writing) for a single-day ultra gravel event, mounted to aerobars. Note OL has announced an alternative version of this light, the Portal, which has a battery and run time similar to the Detour, and is designed to have a wider pattern than the Hangover. If I was buying now (for more of a bike light rather than helmet light), I’d likely choose this over the Hangover.
Exposure Race, MK13. Note that mine is an older Exposure Light, not the latest or current version that I linked. My older unit had okay run time with 5:16 standalone, 11:32 with a 10k battery and 14:56 with a 15k battery. What I like about the Exposure Lights is that they have high construction quality, they are programmable, and they give you a read-out of the remaining run time… no guessing required. These are all metal construction and built like a tank… I’d be more confident in their ability to take some hits than the OL lights. The programming function allows you to choose many different options for high, medium or low output values, which impacts total run time of each. This allows you to fine-tune how much light you need, which is great. The estimated run time is a nice-to-have feature, but it isn’t always perfect (but better than guessing most of the time). What I don’t like is that it charges slowly… almost 7 hours with my factory charger, and 6 hours with a high speed charger (the new new model reports a 6-hour charging time). This can be a big problem if you are trying to use this while doing short sleep stops. I suspect they limit the charging rate to help maintain the battery life, as quick charging is harder on the battery. These also require special chargers and non-standard charging ports on the lights. If you lose your charging cord which is specific to this light, you aren’t going to find one at a bike shop or electronics shop during the race… you are screwed. These lights are also expensive ($319 as of this writing) compared to the other lights I own. Finally, it has a special quick-release mount, that isn’t great. I’ve often had problems getting it to release, and have had other athletes report the same. You can get a GoPro mount for them, but unscrewing a GoPro mount isn’t quite as quick as a typical quick-release mount. Note that one strategy to work around the long charging time is to utilize pass-through charging, and simply charge the battery packs each night, rather than the light. Note that I did find that the lights can dial down the pass-through charging rate (again limiting the charging speed), to the point where even if I had a battery pack on the light, I’d lose some of the main light battery charge during use (e.g. it might drop from 100% to 80%, but primarily use the battery pack). If I was really concerned about durability and longevity (owning/using the light for years), it would be a light to consider, but the extended charging time and special plug requirements would keep me from personally ordering and using a new one of these lights.
Sinewave Beacon 1 and Sinewave Beacon 2. These are great packaged lighting products for use with a dynamo hub. Besides having a high, low and off switch, they include a charger that you can use for electronics (e.g. phone, Garmin, etc.), and a stand light that will provide a small amount of light even when the bike is not moving. The Beacons will also allow you to utilize a battery pack that allows pass-through charging as a cache battery. What this does is provide a constant minimum light level, independent of speed, and keeps the light from flickering at lower speeds, which can happen with some dynamo lights. The light pulls some of the battery as needed, and then when you are not using the light, the hub can recharge the cache battery. Likewise, you can use the cache battery to charge electronics, and the hub will charge the cache battery, when not using the light. The downside is that this takes more energy to charge the battery and then use the battery to charge electronics, but this avoids having the electronics cycle on/off, which happens each time you slow down a bit when trying to charge phones, etc. with a dynamo. As noted above, one thing to consider is the watts of drag created by a dynamo hub, and how it can impact your overall race time. With that in mind, personally I’d potentially use Beacon’s a couple of different ways. If I was using the Beacon only, with no other lights, I’d use it with a battery pack and would charge the battery pack at hotel stops. With a 15k battery pack, I was getting a little over 10.5 hours of use. This would handle most night riding, and if the battery ran out… I could simply use the dynamo for power. This would avoid the drag for most of the riding, and would result in only a small amount of lost time overall. The other option would be to have dual lights… one battery-powered light and a Beacon as a backup and supplemental light. This would allow me to run something like a Detour with battery pack, and simply switch on the Beacon using the dynamo when going downhill, or if my battery pack or primary light died. This isn’t likely something I’d consider for shorter (e.g. intermediate length events), but could be a consideration for some redundancy for a long event. In terms of the differences between the Beacon 1 and 2, the 2 is built to reduce the flicker at low speed when using the hub (which is notable on the 1), and the beam pattern is slightly different, providing a longer throw but a more narrow pattern. Note that I also own a KLite for bikepacking, and while it has even more output and wider pattern… this means even higher drag values during a race. It also lacks the ability to use a battery pack as a source, and it requires a separate charging device. Great for bikepacking in rough areas… less ideal (IMO) for racing.